Wednesday, March 18, 2015

Emergency Pouch for Your Car

In this post I outline another mini-organization challenge~Emergency Pouch for Your Car.  This pouch contains everything I usually need but most of the time never have in my car.  So I decided to bite the bullet and put this kit together and I am so glad that I did!  It has been great and I find myself needing at least one of the items daily as I am running around to and from work, to carpool and running errands.  


I decided that most, if not all the items that I need for this challenge could be purchased at Target (darn, another reason to go to Target;)  I love the Orla Keily line of pouches, makeup bags and travel bags and I got super lucky and found this cute travel case with a car fabric!  It is the perfect size for all of the items that I will need to store in the pouch.  You can use any pouch you have on hand for this challenge.  It can be as big or as small as you like depending on what you will store in the pouch.  I really liked the size of this pouch because it fits perfectly in the console of my car.


This is what the pouch looks like with everything in it.  It is stuffed to the gills!!


I purchased most of these items in the mini-travel supply section of Target while some of the items I already had at home.  The list below is all of the items I purchased and the cost of each item.


  1. Orla Kiely Travel Case, $9.99
  2. Lint Roller,  $.99
  3. Kleenex, $.49
  4. Band-aids, $.49
  5. Vasaline Mini lip balm, $1.29
  6. The Honest Company Hand Spray Sanitizer, $1.99
  7. Tylenol, $1.99
  8. Hair bands, had at home
  9. Ricola Throat drops, had at home
  10. Children size scissors, had at home
The cost of this project for me was $17.23.  If I would have used a pouch that I already had at home it would have only been $7.24!!  I had pouches to use at home but I just couldn't resist the Orla Kiely Car pouch!  I keep the pouch stored in the console of my car for easy access.  I hope that this post inspires you to put together an Emergency Pouch for your car. 

Happy Organizing!

Sara 


Friday, March 13, 2015

Coat Closet Organization


The coat closet tends to be a dumping ground in our house for coats, hats, shoes, scarves and gloves as we come in and out of the house.  This closet has always been a challenge for our family.  Our coat closet is small so when I decided to re-organize the closet I knew that I had to only store things that we use for the particular season we are in.  I will store off-season items in bins that will be stored in our basement.  We are between seasons here, still cold enough most days for coats in the morning with hats and gloves.  The pictures below is the closet before the redo.  We were just storing all of our scarves, hats and gloves on the top shelf which was a big pile of mess!  I had miss-matched hangers and my son's things never quite make it on a hanger, all the items on the floor are his.


 The first thing I did was to remove everything from the closet.  I vacuumed the floor and baseboards and wiped down the top shelve with a dry cloth and multipurpose cleaner.  I then found 2 baskets that I had that fit perfectly side by side on the top shelf of the closet.  I decided to store hats in one basket and gloves in the other.


I then found wooden hangers that I already had and hung all of our current coats leaving a few empty hangers so that we will be able to hang the coats of any guests that visit.


I found this cute over the door 10 hook piece at Big Lots for $3.50!  I love it and it fits perfectly inside the door.


I can store all of our scarves on these hooks in the colder months and during the warmer months we can store baseball caps, umbrellas and even flip flops on the hooks.


 Sorry for the awkward angle, we have tight hallways so this was as good of a picture that I could get.  The floor is clear except for a folding step ladder.


 I really think baskets and over the door hooks are great organizing items for closets.  They allow you to separate and store like items and allow you to utilize as much space as possible which is important since most hallway and coat closets are on the smaller side.  This project only cost me $3.50 for the over the door hooks.  I used what I had as far as the baskets and the hangers.  Often times small organizational projects like this are very low cost because you can use items that you already have in your home.  I hope this simple organizing project shows readers how easy and budget friendly organizing can be.

Happy Organizing!!

Sara


Thursday, March 5, 2015

The Tangled Scarf Abyss!

We have yet another snow day today so I am home waiting patiently (not really) for Spring to come!!!  While I am waiting I am doing little organizational and cleaning projects each week to try to get my house clean and organized so that when Spring does show her tiny head the house will be clean, organized and ready for Spring!  Today I tamed my unruly scarf collection!  For years I have just been throwing my scarves around a hanger and it is always a tangled mess not to mention the fact that it usually takes me forever to find the scarf that I want because it is lost in the abyss of scarf tangles!  I have seen all the "scarf organizers" that companies are now making but I really wanted to find something more budget friendly so I decided to use shower curtain rings that I purchased for $1 and a wooden hanger that I already had in my closet.  


Here is the tangled disaster of scarves that I yanked off the hangers and threw on the floor in disgust!


To do this project all you need is a set of shower rings and a sturdy hanger.  If you have a ton of scarves you may need more hangers and more rings!  Put the rings on the hanger and make sure the clasps are closed.


Loop the scarves one at a time through each ring.  My hanger holds 12 rings easily.  I keep my scarf hanger hanging on a door hook right inside my closet door so that I can just open it and see all my scarves easily and grab the one I need for the day!


I hope that you have enjoyed this scarf organization project!  Total cost was $1 and it took about 15 minutes!!  I love the way this little project turned out and I hope it motivates you to tackle your unruly scarf collection soon!!

Happy Organizing!

Sara
Saturday, February 28, 2015

Roasted Sausage with Red Wine and Fennel

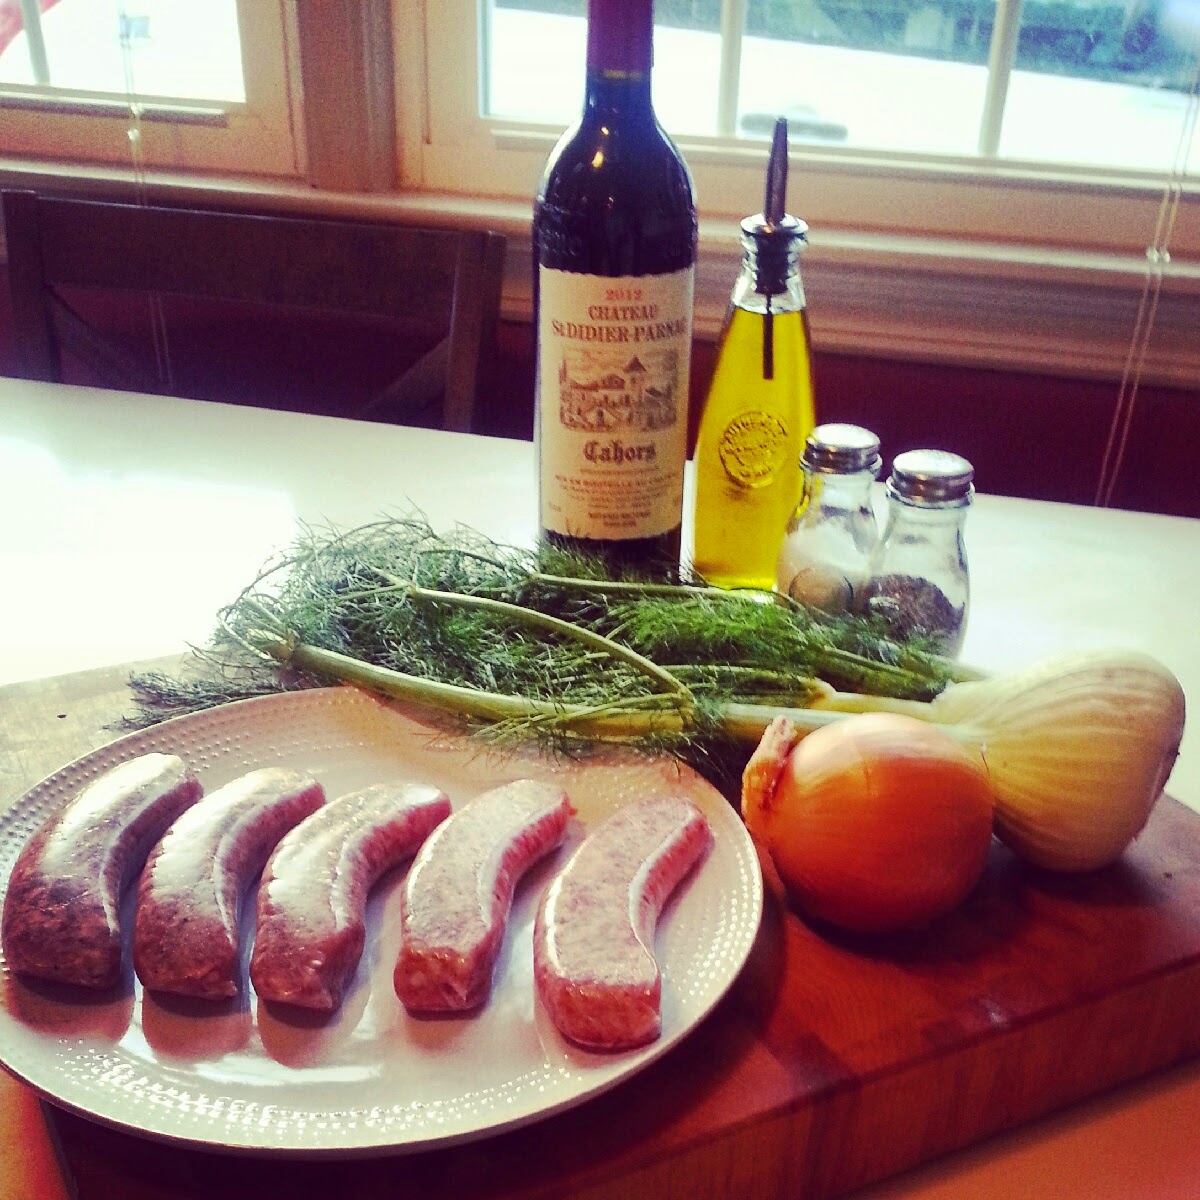
This post is a bit late but I wanted to share a recipe with you that we made last Sunday for our Oscar Night Dinner.  Every year on the Sunday of the Oscar's my husband and I plan to cook a nice meal to enjoy before we settle in to watch the Academy Awards for the night.  I came across this lovely book as I was perusing our local library last Saturday called A Kitchen in France, A Year of Cooking in My Farmhouse written by Mimi Thorisson.  It is a beautiful book filled with gorgeous photos that her husband took of the French Countryside, food, life and wine.  My husband picked out a recipe for Roasted Sausages with Red Wine and Fennel.  I love the book because all of the recipes have simple, fresh ingredients.  I didn't have to go to the grocery and get 20 things like a lot of recipes out there.  The basic ingredients were mostly things that I already had in my kitchen. 


Roasted Sausage with Red Wine and Fennel

  • 2 tablespoons extra virgin olive oil
  • 1 tablespoon Dijon mustard
  • 12 good quality pork sausages
  • 1 large fennel bulb, trimmed and sliced
  • 1 large onion sliced
  • a few Sprig s of fresh thyme
  • coarse sea salt and freshly ground pepper
  • 1 cup of dry red wine
  • 2 tablespoons of unsalted butter


I had everything in my pantry or refrigerator except the fennel which is pretty amazing and it just shows you how simple her recipes are.  I had never cooked with fennel before so I was excited to try something new.  

Fennel

We used a Chateau St. Didier-Parnac Cahors dry red wine that my husband and I had been wanting to try.  Since it's a French wine this was the perfect choice for this recipe.  I used a cup for the recipe and we drank the rest with dinner!


PREHEAT THE OVEN TO 350

In a small bowl, mix together the olive oil and mustard.  Put the sausages in a baking dish and drizzle with mustard mixture, and turn to coat.

Roast for 20 minutes.

Add the fennel, onion and thyme, and season with salt and pepper.  Coat all the ingredients in the oil/mustard mixture.

Bake another 25 minutes or until the sausages are cooked through, stirring halfway through the cooking process.

Add the red wine and butter and roast until the wine has reduced and the sauce has become slightly thicker, about 10 minutes.

***Since it was just the two of us I cut the recipe in half.


The kitchen smelled so good and when it came out of the oven it look rustic and very French!!


We served the sausages over a bed of garlic mashed potatoes and drizzled the top with the wine drippings from the bottom of the roasting pan.


We poured our glasses of French wine and sat down and had a nice slow meal together.  I highly recommend Mimi's book, not only does it have fantastic recipes, it also is so pleasing to look at.  The photographs that her husband took are breathtaking and the stories she tells are wonderful.

Happy Cooking!!

Sara


Bathroom Drawer Mini-Organization Project

I woke up this morning and felt like organizing but didn't have a bunch of time to tackle a large project so I decided to do a mini challenge and work on 2 drawers in my bathroom.  I am super excited to share this project because the entire project only cost me $10!! 

 So the  first thing I did was to take all of the item out of the drawers and sort them.  I threw away things that I did not use anymore which wasn't much because I am pretty good about only keeping what I need and use.  Here are the 2 drawers before.  The top drawer stores my make-up and the second drawer stores our oral care.  


The next step was cleaning the drawers.  I used my Method all-purpose cleaner and a dry cloth.  I realized that some of the make-up wasn't coming off so I decided that I better line the drawers with contact paper.


Here are the products that I purchased for this organizing challenge.  The two trays I purchased on clearance at Marshall's for $4.50 a piece and I found this adorable contact paper for $1 a roll at Big Lots!  I was so excited because both of these products are gray and white!!  The trays are very durable and when they get dirty I can just throw them in the dishwasher to be cleaned.


Here are the trays after filling them with all the make-up and oral care supplies.  I used my Brother P-touch label maker to make labels with our names so that we are sure to use the right section.  I spaced the sections leaving a spot in between for hygienic reasons (no one wants their toothbrush touching anyone else's!!).


After I organized the trays I lined both drawers with the cute contact paper.  This step took me less then 10 minutes.  Both of the drawers turned out great and they look fresh and clean!


The trays fit perfectly inside each drawer with a bit of room in the front and back if needed for extra storage.  I keep my make-up bag in the back of the first drawer during the weekends for easy access.


And there you have it!!!!  A quick and affordable mini organizational challenge completed.  From start to finish this project took me about 30 minutes and again, the cost was $10!!!  I hope you enjoyed this post and I hope that it motivates you to do a mini organizational challenge of your own this weekend!!

Happy Organizing!!

Sara

Thursday, February 26, 2015

Vintage Snapshots of Home

In this post I am going to share some of my favorite spots in my house as well as some of my very favorite and treasured things!  Having a home that is cozy and filled with a mix of things old and new, sentimental and fun is how I would describe my style.  I am a lover of white, cream, antique white.....well, you get the drift.  I am also a lover of bright rainbow colors that I have fun with in my office.  Here is a glimpse into some fun spaces and thing in my home!  Enjoy! 


This is my most favorite piece in my office.  It's a simple cube shelf filled with all of my office supplies.  I love color but not necessarily in my main living spaces so I had a lot of fun bringing bright colors of the rainbow into my office.  I store my file binders, craft supplies, greeting cards, cookbooks etc in this shelf.


This is the entrance to my home, the first thing people see when they walk in.  I love this little nook and have filled it with some of my favorite things!  The buffet was purchased at a yard sale for .....get this.....$30!  It is one of my favorite pieces that I own.  Decorating your home DOES NOT have to be expensive.  If you are a thrifter like me you can find amazing pieces at very little cost.  On the buffet I keep a tray of my vintage hobnail and milk glass.   All of the framed photos both on the buffet and on the wall are photos that my brother, who is a photographer,  has taken over the years while he was living at the beach.  This is probably my most favorite nook in our house.


This drop-leaf table was my mother's and I absolutely love the vintage feel it gives my living room.  One of my most cherished pieces!


My dining room is the heart of the house and right off of the kitchen.  It is small and simple but cozy!  I purchased the white farmhouse style table at ....you guessed it!....a yard sale!  It was $40 and I love it!  The chairs are from Target and they were reasonably priced and very heavy and sturdy.


I had to take a pic of this little doorknob ......I purchased it at Pier 1 years ago.  The homemade quilted ornament hanging from it stays up all year round as it was handmade by my mother-in-law and I just love it.  It is just too pretty to only bring out at Christmastime!    She is a very talented quilter and all of her pieces are amazing!


I love all things vintage and I think this little number piece is so cute!  Purchased at Marshall's and I am pretty sure it was under $10.


One of my most cherished pieces of milk glass.  This was my grandmother's and she actually used it as a pot for live plants!  I wanted to continue that tradition but couldn't bring myself to put dirt in it so an artificial little plant found a home there!


How cute is this??!  This vintage photograph is a picture of my mother.  It is the most adorable picture I have ever seen and the frame makes it even better!


One of my brother's photos that is hanging above our buffet.  This is my favorite of all of them!


Last but not least, this vintage picture of a precious baby hung in my father's nursery when he was a baby.  It also hung in my son's nursery and now it lives in our guestroom.  Look at that ornate vintage frame!  LOVE!

I hope that you enjoyed my little gallery and got to see a glimpse into my house and my style!

Happy Decorating!!

Sara


Sunday, February 22, 2015

Bathroom Closet Organizing

 I spent the morning organizing my bathroom closet. I used baskets and plastic bins from Target.  It was a cheap and simple project that took me about an hour. Happy organizing!!!

I pulled everything off of the shelves and sprayed it down with my Methods Multipurpose spray so that the closet was clean and fresh.


 On the top shelf I keep a basket with my cleaning supplies.  I use Method products for the environmental factor and also the smell is amazing!  I also keep my rubber gloves and cleaning towels in this basket.  I buy my cleaning towels at Target there are like 10 to a pack and run around $5!  


On the second shelf I have my plastic bins from Target.  I love the blue color!!  Unfortunately, I went back to buy more but they do not have them in this color anymore.  I bought these last year.  I keep bathroom supplies like cotton balls, q-tips, hand soaps etc in these bins for easy access.  This is also where I store my first aid kit, heating pad and manicure/pedicure supplies.  I used my Brother P-touch label maker to make the labels for each bin.


The three drawer organizer holds all my feminine products in the first 2 drawers and then I store extra soap and tooth paste in the last drawer.  

Happy Organizing!!!

Sara